ModuleForge
Tutorial
This tutorial will demonstrate how to create a simple, single-function module using ModuleForge, with 1 pester test, and deploy via Github workflows.
Part 0 - Local Environment Setup
- Setup your local workspace. You will need to have installed
- PowerShell 7+
- VSCode (or your IDE of choice)
- If you use an IDE other than VSCode, you will need to correct the instructions in this tutorial accordingly
- GIT commandline
- Install PowerShell module dependencies. You will need the following modules from the PSGallery:
Pester5.6+PSScriptAnalyzer1.24+Microsoft.PowerShell.PSResourceGet1.1.1+ModuleForge1.2.0+
Note: All the required modules are cross-platform compatible. You’re OS of choice does not matter.
Here is a code-snippet to help get you started
#Use the legacy PowerShell Get command to get PSResourceGet
Install-Module Microsoft.PowerShell.PSResourceGet

#Switch to PSResourceGet for the remainder
Install-PSResource -repository PSGallery -Name Pester,PSScriptAnalyzer,ModuleForge
Part 1 - New Repository
- Login to your github account
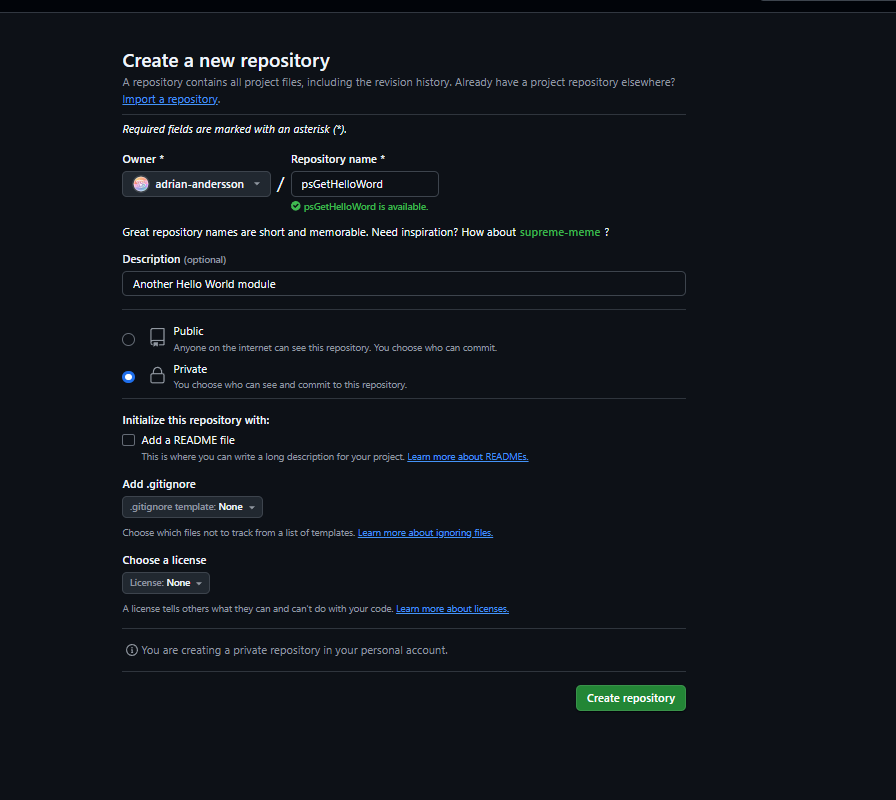
- Browse to your personal repositories and select ‘Create a new repository’
- Fill in the new repository details
- Repository Name should be ‘psGetHelloWorld’
- Repository Description should be ‘Another Hello World Module’
- Repository should be private
- Clone your repository to your local environment
hint: If you are unsure of how to clone a repository, copy the URI from the browser address bar and use it with the
git clonecommand, e.g.git clone https://github.com/adrian-andersson/ModuleForge
Part 2 - Create a new ModuleForge Project
- From your repository directory, run the
New-MFProjectfunction to build the files out, as per the example below - Check you have created a
sourcedirectory and a module config filemoduleForgeConfig.xml. The source directory shoud have a number of subfolders - Run the
Add-MFGithubScaffoldfunction to add 2 github workflow files and a PR template to the.githubdirectory of your module folder - Check the files were created
- With your filestructure created and workflows added, commit and sync your repository back to origin\main
- You should use a proper commit message, something like `chore: Initialised ModuleForge project with scaffolding & workflows’
New-MFProject -ModuleName 'psGetHelloWorld' -description 'Another Hello World module'
Add-MFGithubScaffold
Part 3 - Create a Function and a Test
Creating our get-helloWorld function
- Create a branch called
feature/hello-world-function. You can deviate from this naming convention if you like. The objective is to be consistant. - Create a new file in the
functionssub-directory of thesourcedirectory- Call the file
Get-HelloWorld.ps1
- Call the file
- Code up your powershell function code.
- An example is provided below
- Make sure you include some form of Inline Help and follow good coding practices
Hint: In VSCode you can create a branch by clicking on the current branch name in the bottom left corner, then in the dialog box, selecting
+Create New Branch. VSCode will automatically switch you to the new branch
function Get-HelloWorld
{

    <#
        .SYNOPSIS
            Return Hello World

        .DESCRIPTION
            Return Hello World. Allows you to overwrite the default name of world with

        .EXAMPLE
            Get-HelloWorld

            #### OUTPUT
            Returns "Hello World!"

        .EXAMPLE
            Get-HelloWorld -name 'James'

            #### OUTPUT
            Returns "Hello James!"
    #>

    [CmdletBinding()]
    PARAM(
        #Name param, specify to override the default of World
        [Parameter()]
        [string]$name = 'World'
    )
    begin{
        #Return the script name when running verbose, makes it tidier
        write-verbose "===========Executing $($MyInvocation.InvocationName)==========="
        #Return the sent variables when running debug
        Write-Debug "BoundParams: $($MyInvocation.BoundParameters|Out-String)"

    }

    process{
        "Hello $name!"
    }

}
Creating our Pester Test
- Create a new file in the
functionssub-directory of thesourcedirectory- Call the file
Get-HelloWorld.Tests.ps1 - It is important that
Testsis in the correct, capital-case format forInvoke-Pesterto work.
- Call the file
- Code up your Pester Test. You can use the example below
- Don’t forget to load your functions file in a before all block
- This can be achieved dynamically with this little piece of code:
. $PSCommandPath.Replace('.Tests.ps1','.ps1')
BeforeAll{
    #Load The Function File
    . $PSCommandPath.Replace('.Tests.ps1','.ps1')
}

Describe "Get-HelloWorld Default Parameters" {
    BeforeAll {
        $hello = Get-HelloWorld
    }

    It 'Should not be null or empty' {
        $hello |Should -Not -BeNullOrEmpty
    }

    It 'Should contain "Hello World!"' {
        $hello |Should  -Be 'Hello World!'
    }
}

Describe "Get-HelloWorld Custom Name" {
    BeforeAll {
        $hello = Get-HelloWorld -name 'James'
    }

    It 'Should not be null or empty' {
        $hello |Should -Not -BeNullOrEmpty
    }

    It 'Should contain "Hello James!"' {
        $hello |Should  -Be 'Hello James!'
    }
}
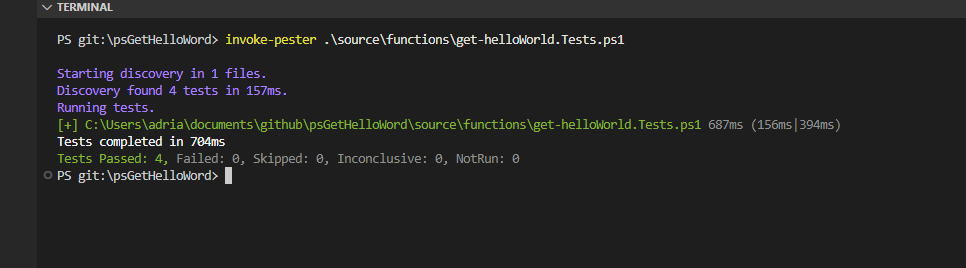
Run our Pester Test Locally
- It is a good idea to test locally before we submit our code back to the repository
- We can do that from our invoking pester from our working directory, as per below
- If everything is working as intended, you should have passed the 4 tests (represented in our Pester test as ‘It’ blocks)
Invoke-Pester '.\source\functions\Get-HelloWorld.Tests.ps1'
Part 4 - Pull Request and BuildAndRelease
Commit Changes
- Commit just our functions file with the
featcommit prefix and a relevant comment- Something like
feat: added Get-HelloWorld function
- Something like
- Now commit the pester test file using the
testcommit prefix- Something like
test: added Pester testing for Get-HelloWorld
- Something like
- Publish your branch back to github
Hint: If you are not sure how to commit in VSCode, switch to the
Source Controlitem in the left-most menu. You will need to stage each file by clicking the small plus sign next the the filename. Enter the commit message into the text box labelled changes, when ready, hit commit. Once all your files are committed, you can publish your branch with thePublish Branchbutton that replaces theCommitbutton
Create Pull Request
- In your browser, navigate to your new repository. You should see a notification banner in the top of github advising that a new branch can be used to create a PR.
- Click the option to create a Pull Request
- Fill in the Pull Request template
- Type in a decent description
- Check the appropriate options with an
Xto help determine your next version, and to make it easier to review later. 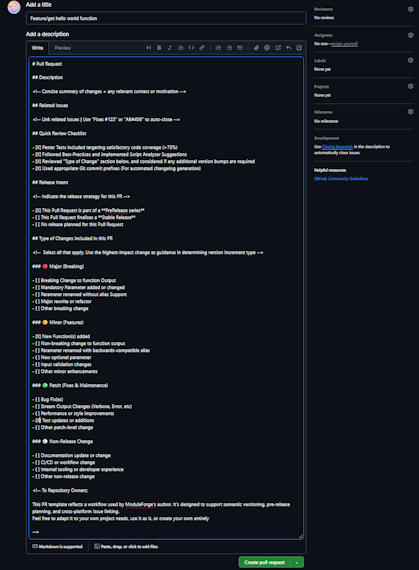
- Once you have completed the PR template, create the Pull Request
- On submission of a Pull Request to the Main branch, the Pester and ScriptAnalyzer workflows will automatically be invoked. The results will be added as comments to the PR
- If everything is tracking well, our tests passed, there are no merge conflicts, and we should be ok to proceed to
Merge Pull Request

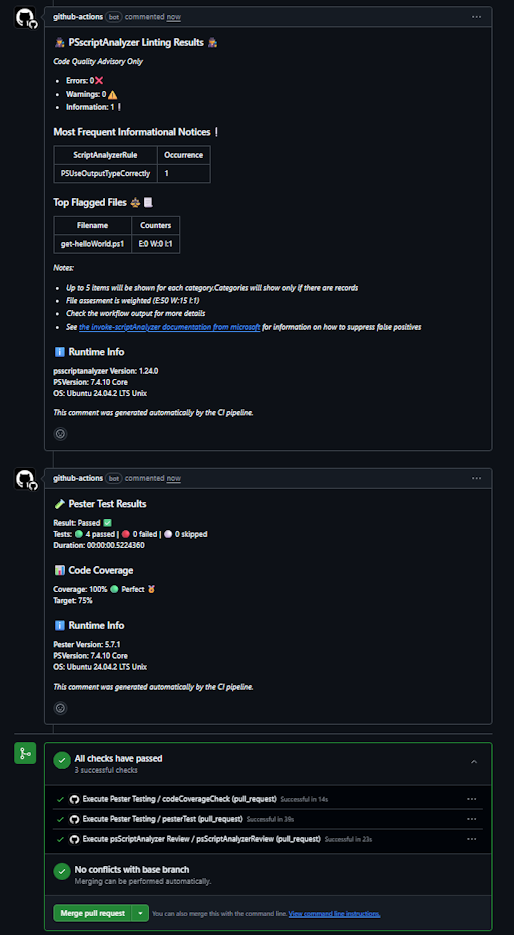
If you want to explore your pester results in more details before a merge, you can click on
Actions, find thepesterTestworkflow, and expand theRun pester testsstep from our latest run to view things such as code coverage, or get more details on failures etc.
Build and Release
- With our Pull Request merged, navigate to
Actionsmenu - Find and select the
Build and Releaseworkflow - This workflow has a
workflow_dispatchevent that we can use to version, build and release our code as a PowerShell module - Select the
Run Workflowoption, a menu will appear. Fill out the fields appropriately and then chooserun workflow- Branch should be main
- Since this is our first release, lets leave the type to increment as
none - Type of release should be
prerelease 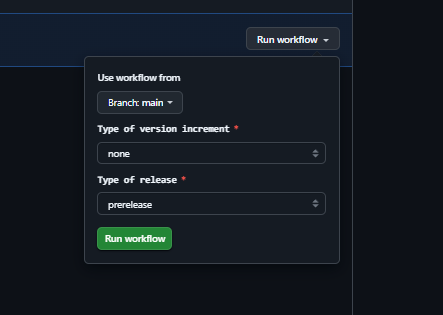
- Wait for our workload to finish.
- Navigate back to the
codetab after the workflow completes. You should now see:- A new Release with a version tag and a
latestbadge - Packages set at 1
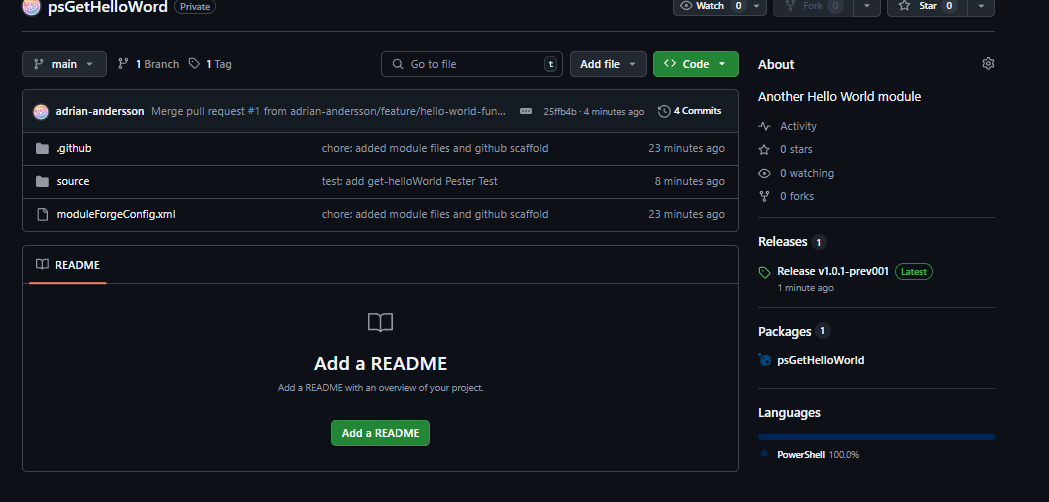
- A new Release with a version tag and a
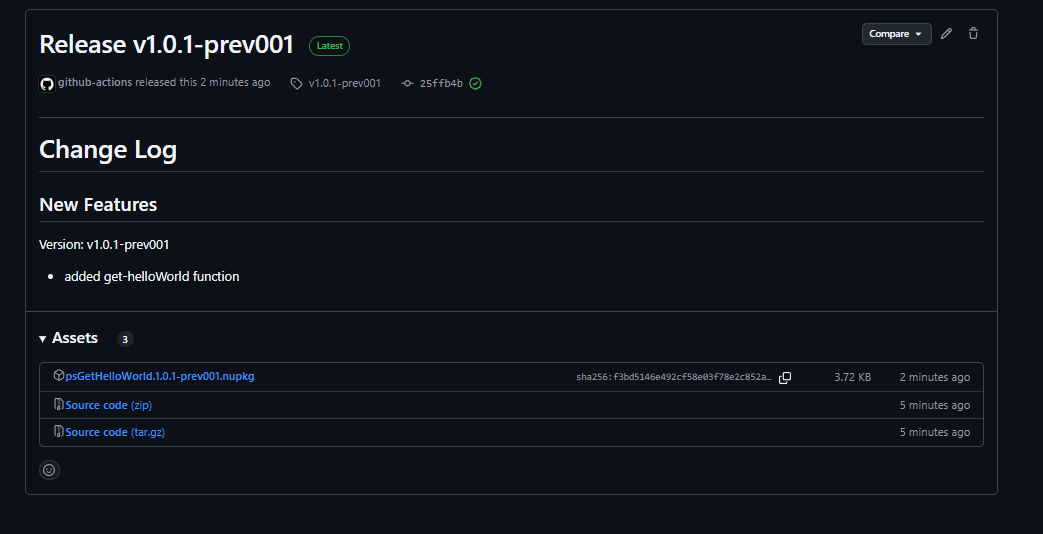
- Click on the release to see more details
- The release should have created a changelog based on our commit messages
- There should also be some artifacts, or assets, with the important one being the nupkg file. This file contains our module.
Don’t forget to checkout the Main branch on your local working directory before adding any more code.
If you want to manually download and install your new module, you can download the nupkg from the releases page, rename the extension to
.zipand uncompress to find your module.
Part 5 - Install locally with PSresourceGet
In your PowerShell terminal with PSResourceGet ready to go, you can register a new repository. You will only need to register the repository once, as github package feeds are unique to the user or organisation, not the repository.
- Create a Git Classic Personal Access Token.
- It only needs Package Read access.
- This will form the password part of our credential object and allow us to use the Github Packages feed.
- In a PowerShell Terminal, register your github packages feed as a repository
- There are two ways to register,
- With a Credential Object,
- With a special CredentialInfo class (If you are using
Microsoft.PowerShell.SecretManagementmodule). This is the recommended approach
- There are two ways to register,
Using Github Package Feed with Credentials
To register with a credential, see the example code below
### Create a credential object
### Your username will be your github email
### The password will be the github PAT you created
$githubCredential = Get-Credential

#use the Register-PSResourceRepository commandlet to register
#This is easier to do with splatting
#Don't forget to swap out the githubaccount with your actual github account
$splat = @{
    Name = 'myGithubPackages'
    Uri = 'https://nuget.pkg.github.com/{githubaccount}/index.json'
    Trusted = $true
}
#Splat it in
Register-PSResourceRepository @splat

#Once registered, you can use it in a similar fashion to PSGallery
#Don't forget to specify the -PreRelease flag
Find-PSResource -Name psGetHelloWorld -Prerelease -Repository myGithubPackages -Credential $githubCredential
Using Github Package Feed with a Secret Vault (Recommended)
To register with Microsoft.PowerShell.SecretManagement, first, create a new secret in your secret vault. The username should be your github email, and the password the PAT you created
### Create a pointer to your secret and vault
### Your username will be your github email
### The password will be the github PAT you created
#You will need to make sure that PSResourceGet module is imported first
$credentialInfo = [Microsoft.PowerShell.PSResourceGet.UtilClasses.PSCredentialInfo]::new('VaultName', 'SecretName')

#use the Register-PSResourceRepository commandlet to register
#This is easier to do with splatting
#Don't forget to swap out the githubaccount with your actual github account
#
$splat = @{
    Name = 'myGithubPackages'
    Uri = 'https://nuget.pkg.github.com/{githubaccount}/index.json'
    Trusted = $true
    CredentialInfo = $credentialInfo
}
#Splat it in
Register-PSResourceRepository @splat

#Once registered, you can use it in a similar fashion to PSGallery
#Don't forget to specify the -PreRelease flag
#Because we supplied a CredentialInfo pointer, Find-PSResource will automatically open our vault to retrieve the secret when required
Find-PSResource -Name psGetHelloWorld -Prerelease -Repository myGithubPackages
A note on V3 nuget feeds and PSResourceGet. Wildcard searching is not supplied, you will need to know the exact name of your module for find and install commands to work.
Wrapping up
In this tutorial, we created a new repository, added our ModuleForge scaffolding, created a new PowerShell function + test, performed a review and unit test, and released it as a PreRelease into our private Github Packages repository for consumption. We effectively made a CI/CD PowerShell Pipeline using Github Actions + ModuleForge, and published a single-function module.